Optimization Code Structure
This is an overview of how optimization is done in SUAVE. A specific tutorial case is also available here.
Nexus Class
The Nexus class is the underlying data structure that is used for optimization. It is created to hold all data and functionality needed to link together optimizers and the various analysis modules in SUAVE. Detailed information on each of the functions can be found on our doxygen page.
Standard Optimization File Structure
These are the standard files that are used in the optimization process. They are typically stored as Optimize.py, Vehicle.py, Analysis.py, Mission.py, Procedure.py, and Plot_Mission.py. These names can be changed if desired.
Optimize
This is the top level file that is run to perform the optimization. Inputs, objective, constraints, and aliases are specified here. The inputs have an initial value, bounds, a scaling factor, and the units used. This provides later functions with the information needed to vary the parameters. Units.less indicates a unitless quantity. SI units are the default in SUAVE’s internal calculations, so Units.meter will not modify the internal value, while something like Units.foot will.
problem.inputs = np.array([
[ 'wing_area'     ,  125.  , (   120.   ,   180.   )  ,   100.  , Units.meter**2],
[ 'aspect_ratio'  ,  3.3   , (   2.0    ,   6.0    )  ,   10.   , Units.less],
])
Constraints and the objective are similar. Both have scaling quantities and constraints also have bounds.
problem.constraints = np.array([
[ 'design_range_fuel_margin', '>', 0., 1E-1, Units.less]
])

problem.objective = np.array([
['fuel_burn_rate', 1., Units.kg/Units.s]
])
Finally we have aliases. This provides the optimization process with the position of the various parameters in the data structure. Aliases are used so that short names can be used for variables and a single variable can control multiple items in the data structure. Controlling multiple items can be important if different vehicle configurations are used at different points in the mission, and one of the vehicle parameters should change in the same way for all of the configurations. We can use * as a wildcard. This is used below to change the aspect ratio of the main wing in every vehicle configuration.
problem.aliases = [
[ 'wing_area'       ,   ['vehicle_configurations.base.wings.main_wing.areas.reference',
					'vehicle_configurations.base.reference_area']],
[ 'aspect_ratio'    ,    'vehicle_configurations.*.wings.main_wing.aspect_ratio'       ],
[ 'fuel_burn_rate'  ,    'summary.fuel_burn_rate'                                      ],
]
This file then specifies the configurations, analyses, missions, and procedure that will be used. This are typically contained in separate files and more details on each are below. Once all of this is specified, the desired optimizer is called with the nexus class created by this setup.
Vehicle Setup
This contains the vehicle information such as geometric data and configurations. It is the same as the vehicle setup used for basic analysis purposes.
Analysis Setup
This contains information on what analyses should be run for the vehicle. For example if correlation-based aerodynamics or AVL should be used for computations. It requires vehicle information from the previous step.
Mission Setup
This is also the same as the standard mission setup. It determines how the mission will be flown. It requires analysis information from the previous step.
Procedure
This is an optimization specific file that determines how the vehicle, analysis, or mission is modified with the input values in the optimization and also runs the mission. For example, changing the wing area will usually require changes to other wing parameters, such as root chord length. This module reads the new inputs and changes other values accordingly based on user specified processes.
Plotting
This function is not necessary to the optimization, but is often included in the files used and is added to the optimize main call as a way to visualize the results.
Optimizer Interface
The other step that must be taken to perform an optimization is to convert the standardized input above into values that can be used by the selected optimizer. This is done through a separate script for each optimizer, all of which are found in the optimization folder.
For example, if we are using PyOpt to optimize, we might use output = pyopt_setup.Pyopt_Solve(problem,solver='SNOPT') in the main function of the top level optimizer. This function reads the inputs, constraints, and objective and converts them to a format that the selected optimizer (SNOPT here) can understand.
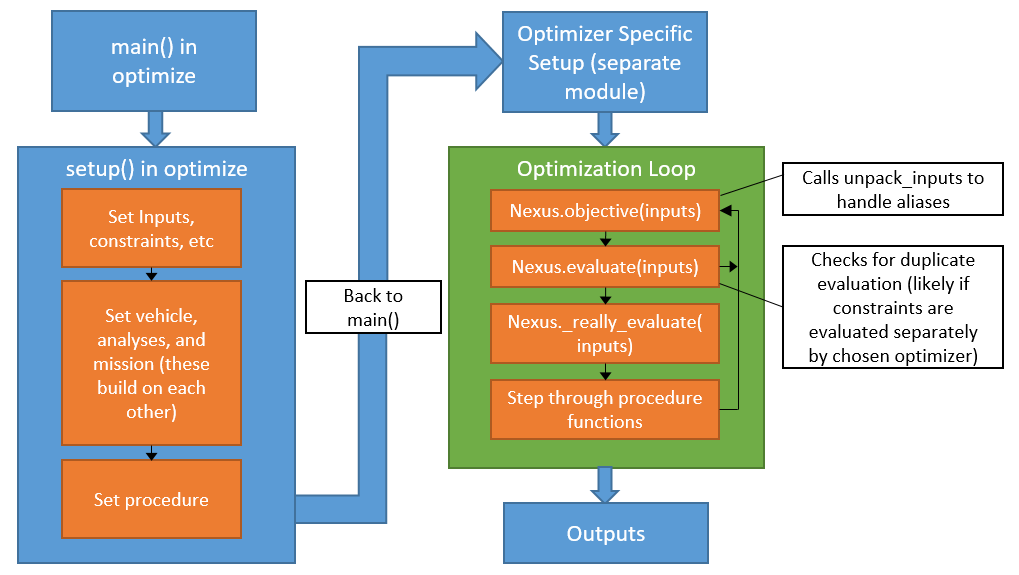
Evaluation Process
This shows the typical evaluation process, including where items like inputs and aliases are used. This chart assumes a single objective call, but some optimizers will include calls such as all_constraints which require another evaluation. If the evaluation is a duplicate, data from the previous evaluation will be used instead of stepping through the procedure again.
Incorporating Multi-fidelity
Multiple levels of fidelity are designed to be relatively easy to incorporate in SUAVE, but there are still a few things to keep in mind. First, the chosen optimizer must support multi-fidelity and be able to change the nexus.fidelity_level value. Once this is done, it is also important to remember that the mission is set up based on the analyses. This means that if a change is made to the analyses then the mission must be rebuilt with the new settings. As an example, code below for changing the analysis level is shown. This is a function that has been added to the procedure file.
def set_fidelity_level(nexus):

if nexus.has_key('fidelity_level') == False:
	print 'Fidelity level not set, defaulting to 1'
	nexus.fidelity_level = 1

if nexus.fidelity_level == 2:
	aerodynamics = SUAVE.Analyses.Aerodynamics.Supersonic_OpenVSP_Wave_Drag()
	aerodynamics.settings.number_slices    = 20
	aerodynamics.settings.number_rotations = 10
elif nexus.fidelity_level == 1:
	aerodynamics = SUAVE.Analyses.Aerodynamics.Supersonic_Zero()
else:
	raise ValueError('Selected fidelity level not supported')
aerodynamics.geometry = copy.deepcopy(nexus.vehicle_configurations.base)
nexus.analyses.base.append(aerodynamics)

nexus.missions = mission_as2.setup(nexus.analyses)

return nexus
Here we see that nexus.missions has been updated in addition to nexus.analyses, since failing to do this would have the mission run with the previous analysis settings.
Key Functions in the Optimizer Setup
We briefly mentioned how optimization parameters would need to be converted so that they could run with a particular optimizer. Here we show how this is managed and show which functions are likely to be useful in building a new optimizer setup.
The key items that will be needed for most optimizers are shown below, taken from the PyOpt setup:
inp = problem.optimization_problem.inputs
obj = problem.optimization_problem.objective
con = problem.optimization_problem.constraints

# Set inputs
nam = inp[:,0] # Names
ini = inp[:,1] # Initials
bnd = inp[:,2] # Bounds
scl = inp[:,3] # Scale
typ = inp[:,4] # Type
These can be scaled with two helper functions that are part of the SUAVE distribution:
from SUAVE.Optimization import helper_functions as help_fun

bnd_constraints    = help_fun.scale_const_bnds(con)
scaled_constraints = help_fun.scale_const_values(con,bnd_constraints)
x                  = ini/scl
What happens next is entirely dependent on what optimizer you want to use. Some may require that constraint bounds happen at 0 or are either > or <. However this setup is done, you will likely need to create a function that can accept the problem and inputs and give required outputs such as the objective value and constraints. In the PyOpt case, this is done with a simple wrapper and an added function:
mywrap = lambda x:PyOpt_Problem(problem,x)
…
def PyOpt_Problem(problem,x):

	obj   = problem.objective(x)
	const = problem.all_constraints(x).tolist()
	fail  = np.array(np.isnan(obj.tolist()) or np.isnan(np.array(const).any())).astype(int)


	print 'Inputs'
	print x
	print 'Obj'
	print obj
	print 'Con'
	print const

	return obj,const,fail
Please visit our forum if you have any other questions on how the optimizer interface works or how to convert the values to what you need.